Workflow Pane
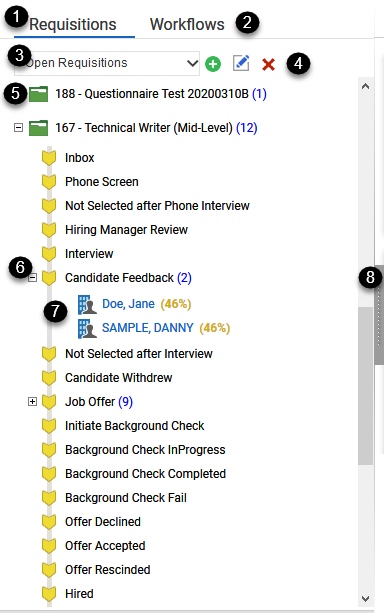
The Workflow pane lists the requisitions and workflow folders that meet the selected filter criteria. The numbers listed beside the requisition or workflow folder indicate the number of candidates associated with the requisition or folder. The blue number equals the total number of candidates. The second number, in bold font, equals the number of recently added candidates to either the requisition or workflow folder.
For more information, see About Workflow.

Figure: Workflow Pane with Major Elements Highlighted
The elements of the Workflow Pane are listed and described below. Additional information about the functionality associated with the navigation elements is available from the corresponding help topic.
Table: Elements of the Workflow Pane
|
Reference Number |
User Interface Element |
Description |
|
1 |
Requisitions Tab |
When selected, the tab displays a list of requisitions that you have permission to view. The currently selected requisition filter determines which requisitions are listed. Click the Requisitions tab to refresh the view. |
|
2 |
Workflows Tab |
When selected, the tab displays all the candidates who are in each workflow folder, regardless of the requisition to which they assigned. The total number of candidates displayed is determined by the currently selected requisition filter and the number of requisitions you have permission to view. Click the Workflows tab to refresh the view. |
|
3 |
Requisition Filter |
Requisition filters are used to manage the list of requisitions that is displayed in the Workflow pane. For example, you can use filters to display only requisitions that you need to approve, or only requisitions that are assigned to a specific hiring manager. |
|
4 |
Filter Management Icons |
If you have the required permissions, you can create, edit, and delete requisition filters.
|
|
5 |
Requisition Folders |
The Workflow pane lists all requisitions that meet the criteria specified by the selected requisition filter. The folder icon next to the requisition name indicates the requisition's status as well as any recent activity. For more information, see Requisition Folder Icons. |
|
6 |
Workflow Folders |
Click the plus (+) sign next to a requisition name to display the workflow folders associated with it. Each workflow folder represents a step in your company’s hiring workflow. The hiring workflow is configurable based on your company's hiring process, so the workflow folders you see in your application may be different than the workflow folders shown in the figure above. |
|
7 |
Candidate Record |
Click the plus (+) sign next to a workflow folder name to display the candidates associated with it. The blue number next to the workflow folder name indicates the number of candidates within the folder.
If a candidate's name is displayed in bold font, the candidate has been recently moved into the folder. The icon associated with the candidate record in the Workflow pane provides a visual cue as to the origin of the candidate. For more information, see Candidate Icons.
The percentage value next to the candidate's name indicates a correlation of matching words between the candidate's resume within the requisition folder and the requisition's job description and job requirement fields. The higher percentages indicate that the candidate's resume is a better match with the requisition job description and job requrirements as compared to other candidates within the same folder. For more information, see About Candidate Compare. |
|
8 |
Workflow Pane Toggle Bar |
Click the toggle bar and drag the pane to resize it. The user's size setting will be saved for 30 days. |
Additional Information