About Candidate Workflow
The Workflow pane contains a list of requisitions (job openings) that meet the criteria specified by the filter you have chosen. Click the + symbol next to the requisition name to display the workflow folders within the requisition. Each workflow folder represents a step in your company’s hiring workflow. The workflow folders are designed to mirror your company's particular hiring process. Therefore, the folders you see in your PeopleFluent Recruiting Portal may differ from the examples shown here. The blue number following each workflow folder name indicates the total number of candidates in the folder. The second number, in bold, indicates the number of candidates who have been recently moved into the folder. Empty folders do not have a number next to them. Depending on your permissions some workflow folders may not be accessible. If a workflow folder name appears in gray, you can view the candidates in the folder, but you cannot move candidates into or out of the folder.
Click the + symbol next to the workflow folder name to display the names of candidates currently in the workflow process. Candidate names displayed in bold have been recently added to the folder. The icon in front the candidate's name provides additional information about the candidate such as if the applicant is an internal or external candidate, if the candidate was referred by another employee, or if the candidate profile is locked. Additional candidate information is also displayed in the Candidate List pane at the bottom of the Details Pane. Click on the toggle button to expand or minimize the pane. The contents of the Candidate List pane are set using the Configuration button on the Candidate Summary panel (widget) on the Dashboard.
Candidates can be moved through the hiring process by simply dragging them from one folder in the workflow to the next. As a candidate progresses through the process, email notifications to the candidate and to recruiters, hiring managers, interviewers, and on-boarding task owners are automatically generated to alert them of a pending interview, candidate offer approval, or required tasks for newly hired candidate.
Click the Workflows tab in the pane to see a snapshot of all candidates in the workflow process for all requisitions that meet the selected requisition filter criteria. This view allows the user to sort candidates by the interview workflow process since different workflows can be configured for different job types (hourly vs. salary), department (manufacturing vs. information technology), or location (USA vs. Asia).
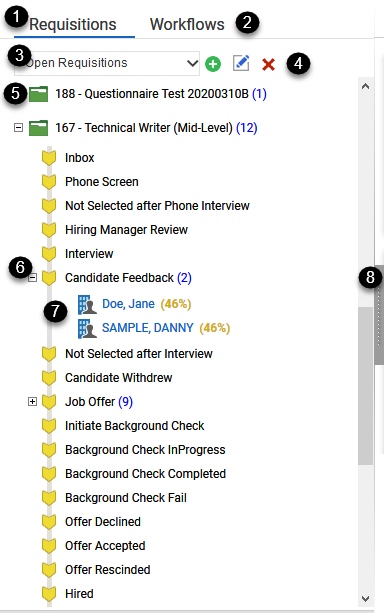
Figure: Workflow Pane and Folder Elements
The elements of the Workflow pane are listed and described below. Additional information about the functionality associated with the elements is available from the corresponding help topic.
Table: Workflow Pane Elements and Descriptions
|
Reference Number |
User Interface Element |
Description |
|
1 |
Requisitions Tab |
When selected, the tab displays a list of requisitions that you have permission to view. The currently selected requisition filter determines which requisitions are displayed. Click on the Requisitions tab to refresh the view. |
|
2 |
Requisition Filter |
Requisition filters are used to manage the list of requisitions that is displayed in the Workflow pane. For example, you can use filters to display only requisitions that you need to approve, or only requisitions that are assigned to a specific hiring manager. If you have the required permissions, you can create, edit, and delete requisition filters.
|
|
3 |
Requisitions Folders |
The Workflow pane lists all requisitions that meet the criteria specified by the selected requisition filter. The folder icon next to the requisition name indicates the requisition's status as well as any recent activity. For more information, see Requisition Folder Icons. |
|
4 |
Candidate Records |
Click the plus ( +) icon next to a workflow folder name to display the candidates associated with it. The blue number next to the workflow folder name indicates the total number of candidates within the folder. If a candidate's name is displayed in bold font, the candidate has been recently moved into the folder. The icon associated with the candidate record in the Workflow pane provides a visual cue as to the origin of the candidate. For more information, see Candidate Icons. |
|
5 |
Workflow Folders |
Click the plus ( +) icon next to a requisition name to display the workflow folders associated with it. Each workflow folder represents a step in your company’s hiring process. The hiring workflow is configurable based on your company's hiring procedures, so the workflow folders you see in your application may be different than the workflow folders shown in the illustration above. |
|
6 |
Candidate List |
The Candidate List appears below the Details pane. When a workflow folder containing candidates is selected in the Workflow pane, the candidates within the folder are listed in a summary table on the Candidate List pane. Click the Grab Bar / Toggle Pane button to expand the Candidate List pane. For more information, see About the Candidate List Pane. |
|
7 |
Workflows Tab |
When selected, the tab displays all the candidates who are in each workflow folder, regardless of the requisition to which they assigned. The total number of candidates displayed is determined by the currently selected requisition filter and the number of requisitions you have permission to view. Click on the Workflows tab to refresh the view. |
Additional Information
View All Requisition Candidates
Move a Candidate in the Workflow
Move Multiple Candidates in the Workflow